Jan 31, 2012

Lil Fur Cape

So I bought some faux fur fabric last year with the intention of making Miss Stasia a cape. One winter come and gone and halfway through another and I finally did it, and she LOVES it! It's almost impossible to get it off her!!


Miss Stasia and her favorite kitty Peaches

  
I used the basic idea from THIS awesome tutorial from the ladies at Project Run and Play. I didn't do the collar cause the fur seemed too bulky to do so, also I can't draft a pattern to save my life and I couldn't print out her collar pattern since we still don't have a printer around here (Stasia danced on our old one!). I also did a loop and stuffed button instead of a buttonhole and covered button.  

Then I made her a matching hat...


Stay tuned for the tutorial on the hat....


Jan 27, 2012

Shopping Bags out of T-shirts

Sorry for the pucker in this pic! I didn't stuff the bag with anything before I hung it up, I just snuck out as quick as i could without the kiddos noticing!!

So my original inspiration came from the wonderful folks at Martha Stewart. Find her tutorial HERE.
But of course, some moderations were made!
Mainly i just changed the bottom of the bag, I wanted to have somewhat of a 'base'. 
So that's just an elaborate way of saying I sewed the corners....


And this is what it looks like!


And you can add embellishments!

The flowers are kinda heavy, but not too bad :)

And you can make these from the scraps! I found this cool tutorial at Lil Blue Boo. Find it Here.


Or, if you used long sleeved shirts to make your bag, you can make these from the sleeves...  This tutorial can be found at Homemade by Jill,  HERE


Happy Crafting!!


Jan 23, 2012

Washing Day...

I have been thinking about making my own laundry detergent for some time. Several of my friends make theirs with excellent results, and my mother-in law has made her own for over 20 years. Her's was liquid though, and I just couldn't see storing a 5gal bucket of detergent in my household (recipe for disaster I say!). So when I ran across THIS recipe the other day, it looked easy enough for me to manage and it was powder! Like with most of my attempts, I ran into a few hitches, but it was still really easy and it works GREAT! I decided to chronicle this attempt to share with ya'll!

First I gathered my supplies, Borax, Washing Soda, and a Fels Naptha soap bar... I used two bars because I wanted to double the recipe...


Notice the grater in the picture above??? The recipe said I could use one instead of a food processor if i wanted to, and i didn't want to get my processor all junky so I figured that was what I would do....Let me say, I had no where near the patience it would have taken to hand grind that bar of soap!!!!! So then I decided to use the food processor method...
Take the Fels Naptha and chunk it up...

I love the way these bars look! So old-timey!


Then put the chunks in the processor and grind....


Or in my case, stall your cheapo $20 processor and have to find an alternate route to get the soap to a size the processor thinks it can manage.....

This thing has been lying around in my cabinet for ages....it worked like a charm though!


So after the hand grinder it looked like this....


THEN i was able to put it back in the processor to grind to a powdery texture....

OK so not so fine a texture...I was late making dinner, so I needed to speed things up! 

Then you add 1 cup each of Borax and Washing Soda to each bar of soap used (so in my case i used 2 cups Borax and 2 cups Washing Soda) 


Mix together and VIOLA! laundry detergent!


The stuff work great! I was a little worried about how chunky I had left the Naptha, but it dissolves just fine. In fact it works much better than the detergent i have been buying! Hello to eco and budget friendly laundering!!!!


Jan 19, 2012

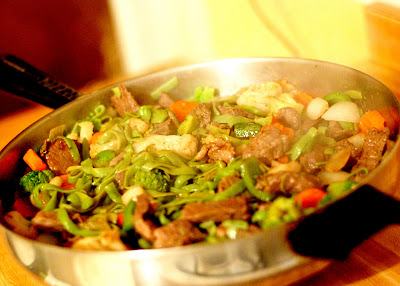
Sorta Stir-Fry?

So my awesome hubby brought home these healthy spinach noodles the other day....

And we tried making a regular meatball/marinara sauce dinner with them. It was OK, but the noodles were a little chewy so I got to thinking that they would hold up perfectly in a stir fry-type meal....SOOOOOOO
I gave it a shot, and it was a huge success! (at least according to the family). Now i don't know how a real stir fry is made up, I just kinda threw everything together...(i'm a fly-by-the-seat-of-my-pants type cook) therefore the name 'sorta stir-fry'.

So basically i just sliced up my meat, (or you could use tofu) and browned it in a pan with a chopped up onion (i like to add ginger, onion salt, parsley and pepper at this point), then I added a chopped bell pepper, and a bag of frozen veggies(we like either green beans or a California medly) and the drained noodles. Cook and stir till thoroughly cooked.

Now it's time to add the seasoning...i LOVE this stuff


Mix it up according to the package instructions and add to stir fry, i like to cook it down a bit...


And Viola! A sorta stir-fry...! 


It's always a huge hit around here...


See? Nothing left! Always a good sign!
Hope you like it as much as we do! Let me know what you think!


Jan 15, 2012

Headwrap Tutorial


Headwrap
Ok, so here goes my first tutorial!!! I've been seeing all these awesome knitted headwraps around these days and since i am no good at knitting(my mother, however, is AWESOME!) i decided to try sewing some. So for this winter i figured fleece would be nice and cozy

CRAZY HAIR!!


So first you cut out your pattern pieces....to make the pattern, I measured around Anastasia's head where i wanted the headwrap to sit (21"). Then I decided how wide I wanted it (3" for her). To draft the pattern i added 2" to the length (1" for seam allowances and another 1" for overlap) and added 1" to the width (for seam allowances) Then I drew out the pattern in the shape i wanted (kinda like a rectangle with tapered,rounded ends), I made a half pattern and cut out the wrap on a fold.... Cut two pieces.

I made a half pattern and cut on the fold to make sure my ends matched


With right sides together, sew pattern pieces together, leaving a gap for turning...

Stitching the pieces together...


Turn right side out, fold in edges of gap, and topstitch....

topstitching....


Then add whatever type of closure you want, I used snaps because I hate buttonholes, and love my kamsnap pliers!

I love my KAMsnap pliers!


So far it will look like this....

Almost Done!

Now I added an embellishment...I used an altered version of Icandy Handmade's super cute Box Fold Flower ...


I made a fabric covered button for the center-they are so much fun to do!!!

Sew the flower on off-center on the band....

Viola! The Box Fold Flower is so easy and cute!!!


And now you have a headwrap!!! 


You can make them any size you want, for little people or big people!!!


Please forgive the lousy picture of me! I didn't have any other big person models available (other than Kenneth, and I don't think he wants to wear pink!)

And there you have it! An easy and cute headwrap! 


Jan 14, 2012

Metropolitan Hat

This is a beautiful pattern from Folkwear. Since it's winter and COLD i thought I'd make it from fleece....


And Miss Anastasia wanted to model it.....please ignore the chocolate yogurt stain.....:P


But I decided i didn't like the rose I made, so i switched it out for a 'Box Fold Flower' I used the awesome tutorial from the ladies at icandy homemade. I liked the final look better....


Here are some pics from the Folkwear site of the hat on an adult...


You can find the pattern Here. It runs on the small side, so I recommend cutting a size larger than it says.

Chocolaty Goodness...!

Well today I had a Scentsy/Girls Night party! It is always fun making desserts and I had a bunch of new recipes I wanted to try out.  There was this awesome post on Pinterest HERE but i had to add chocolate of course.
yummy and almost completely healthy!


hungry yet?


I finally tried making cake mix cookies, with more chocolate.... using THIS recipe...

So easy and so yummy!

My girlfriend Cathie made these yummy fudge frosted brownies....YUM!!

You can never have too much chocolate!

And I HAD to make these 'Schotcheroos'! My mother in law sent us these in our annual Christmas cookie tin and I begged for the Recipe...and got it! And now I will share with you!

1C Light Corn Syrup
1C Sugar
1C Peanut Butter
6C Rice Crispie Treats
1C Chocolate Chips
1C Butterscotch Chips
Put corn syrup and sugar into saucepan, cook over med. heat, stirring until sugar is dissolved and mixture begins to boil. Remove from heat, add peanut butter and stir well. Add cereal and mix well. Press mixture
into a 13x9" pan, set aside. Melt chocolate chips and butterscotch (together) either in microwave or saucepan. Spread over cereal mixture and let cool before cutting. Enjoy!!!

Chocolate, Peanut Butter and Rice Crispies=YUM!
Mr. Paul wanted some too!!!

And to top things off, chocolate dipped Nutter Butters! Can you tell i was jonesing for chocolate?? But what is a girls night without it?!

What can i say-chocolate and peanut butter!

It is always so much fun making desserts! I hope you enjoy the recipes! Happy Baking!


Related Posts Plugin for WordPress, Blogger...